
Audio Solutions Question of The Week: How Do I Align My Audio-Technica Phono Cartridge?
Question: How do I align my Audio-Technica phono cartridge?
Answer: There are a few ways to align a phono cartridge, and we will cover some simple and some more advanced methods in this blog post. Proper alignment of a turntable’s stylus (needle) is needed in order to realize the full potential of the turntable’s cartridge and stylus system. Proper alignment of the stylus as it relates to the record groove ensures the most accurate reproduction of the recording, low tracing noise, and the least amount of wear on both the record and stylus. Various tools are available for achieving this alignment.
Stylus Overhang Gauge
At the very least, the stylus overhang distance specified for a given turntable or tonearm should be met. This is a common spec. Specifically, overhang is the distance the stylus tip extends beyond the center spindle when the tonearm is positioned directly over the spindle. Stylus overhang makes up part of a tonearm’s effective length.
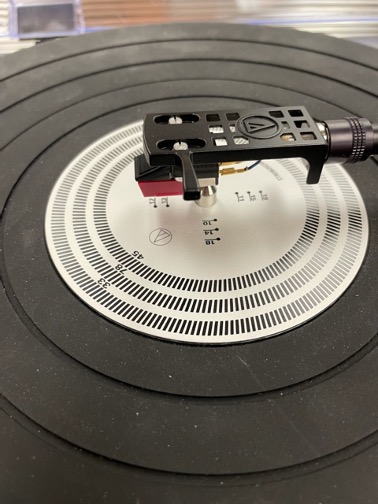
A simple way to set overhang is to use a dedicated overhang gauge that has markings in millimeters (mm). Some gauges are designed to be placed against the spindle, on the side opposite the tonearm pivot, while others, such as our AT6180a Stroboscope Disc / Overhang Gauge shown below, are designed to be placed on the spindle (like a record disc). Spindle-type gauges are sometimes supplied with the turntable, tonearm, or cartridge.
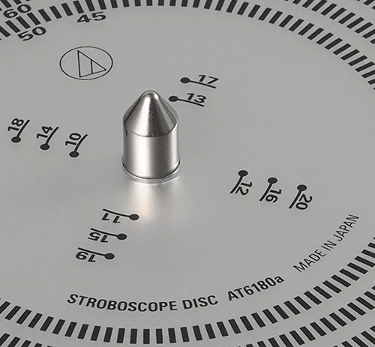 AT6180a Stroboscope Disc with 10 – 20 mm stylus overhang markings
If your particular tonearm does not swing far enough inward to reach the spindle, a headshell-type gauge is a good alternative. This gauge holds a removable type headshell/cartidge assembly, and the measurement used is taken from the headshell post shoulder (aka flange) to the stylus tip. An example of this is the white plastic Technics Overhang Gauge, which Technics supplied with their turntables for many years. See below for instructions. Other manufacturers supplied similar versions. The Technics gauge is 52 mm from the post shoulder to the tip of the stylus. This should equate to 15 mm from the spindle to the tip. The Technics gauge is available for separate purchase.
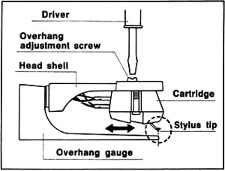
Instructions for using the Technics Overhang Gauge (shown above):
- Insert the headshell into the opening in the gauge until the shoulder on the post of the headhell bottoms out against the gauge.
- Move the cartridge forward or backward as needed to align the stylus tip with the end of the gauge.
- Square the sides of the cartridge body up to the sides of the headshell and snug the cartridge mounting screw.
Cartridge Alignment Protractor
A cartridge alignment protractor may also be used to set overhang and, in addition (and perhaps more importantly), to set the cartridge offset angle and null points. It is important that the stylus be aligned in such a way that its tip remains as tangent to the record groove as possible as it travels across the record. With a pivoted tonearm, it is possible to achieve perfect tangency at only two points as the tonearm travels in an arc across the record. These two points are known as null points (the distance between the spindle and the pivot point where there is no tracking error). A two-point alignment protractor can help achieve this tangency. It is important to choose a protractor that meets the tonearm mounting distance specification published in your turntable’s, tonearm’s, or cartridge’s documentation. Tonearm mounting distance is the distance between the spindle and the pivot. If your documentation does not specify the mounting distance, it can be determined by subtracting the stylus overhang distance from the effective tonearm length. For example, a tonearm with an effective length of 230 mm less an overhang distance of 15 mm would have a mounting distance of 215 mm. If a cartridge alignment protractor was not furnished with your turntable or tonearm, they are commercially available, and printable versions can be found online at websites such as vinylengine.com and conradhoffman.com (click “Custom arc template generator for phono cartridge alignment” to download). Some protractors are designed for specific tonearms and some are more generic, you can even design your own at conradhoffman.com. When using the printable type, make certain the protractor prints to actual size!
The two-point protractor has a dot for the stylus tip to rest on and a grid with lines running parallel to the sides and front of the cartridge to which it should be aligned. Note that we are assuming that the stylus cantilever is centered under the cartridge and parallel to the sides of it. Following is an example of a two-point-type protractor. Like all two-point protractors, it has an outer dot/grid and an inner dot/grid.
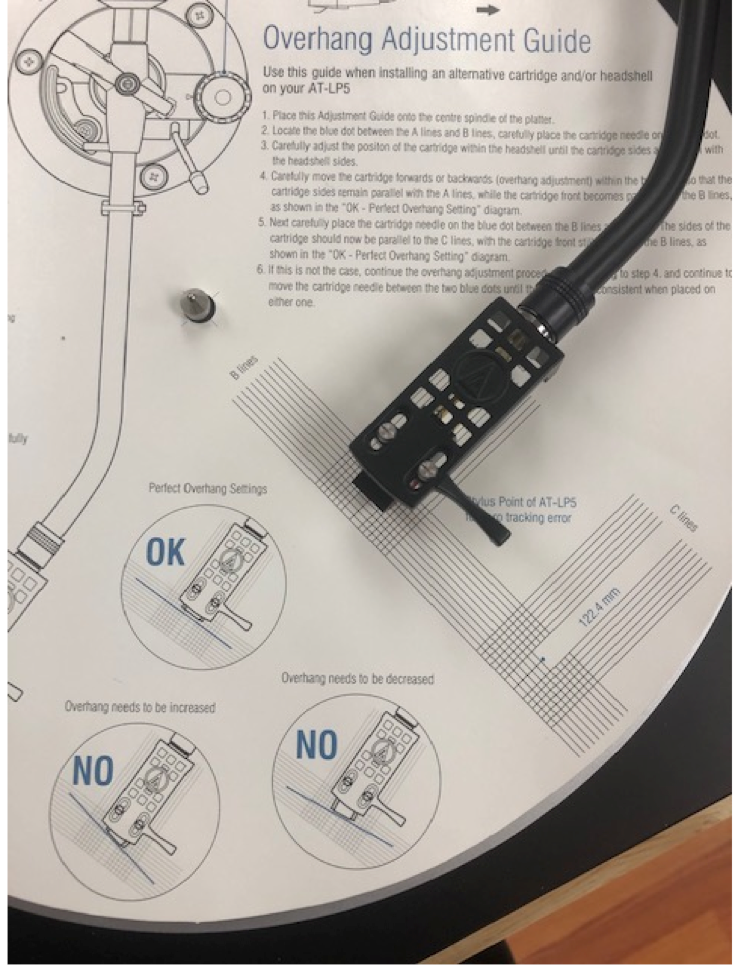 Cartridge Alignment Protractor for AT-LP5 Turntable
With the cartridge mounting hardware just loose enough to allow forward and backward movement of the cartridge in the headshell, position the cartridge within the headshell so that the stylus tip rests on the protractor’s outer dot (the dot farthest from the center spindle). Align the sides of the cartridge body to the lines on the grid which run parallel to its sides. Next, carefully move the cartridge forward or backward (adjust overhang) within the headshell so that the sides remain parallel while the front of the cartridge becomes parallel to the lines on the grid that run across the cartridge’s front.
Once you’ve aligned the cartridge to the outer dot/grid, move the tonearm to the inner dot/grid and check the alignment there. If the alignment is off on the inner dot/grid, adjust the overhang by moving the cartridge forward or backward until the sides and the front are parallel to their respective lines. Recheck the alignment on the outer dot/grid. You may have to go back and forth a few times to achieve the same alignment at both grids. Once aligned, tighten the mounting hardware until snug.
If you need additional assistance aligning your cartridge, please contact our Audio Solutions Department.