
3000 Series IEM
Question: How do I get started with the 3000 Series Wireless In-Ear Monitor System?
Answer: The Audio-Technica 3000 Series Wireless In-Ear Monitor System (ATW-3255) was designed to bring professional sound quality and features to all levels of performers and performance venues. Once a performer uses an IEM system, they will never go back to floor wedges! Here we will talk about the system in general, what’s in the box and basic setup.
General information
The 3000 Series IEM has a wide UHF tuning bandwidth of 138 MHz – in frequency band DF2 (470 – 608 MHz) – for maximum versatility in an increasingly congested RF environment. It shares design elements with the 3000 Series UHF Wireless Systems for easy integration and compatibility. The transmitter can be rack-mounted. The body-pack receiver operates continuously for up to 7 hours when powered by NiMH batteries and charged in the ATW-CHG3 or ATW-CHG3N charging station (sold separately). The 3000 Series IEM offers network monitoring and control via Audio-Technica’s Wireless Manager.

What’s included in the box?
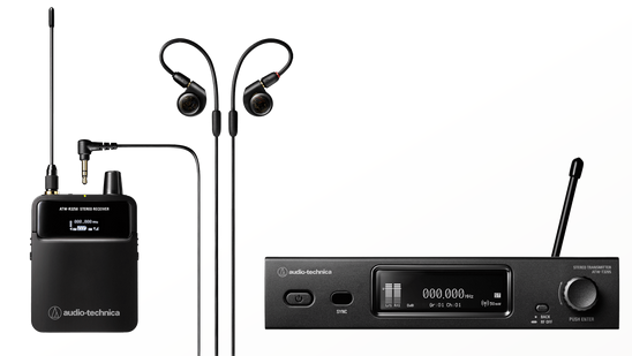
Included with the system are the following:
- Body-pack receiver (ATW-R3250)
- Transmitter (ATW-T3205)
- ATH-E40 professional in-ear monitor headphones, with carrying case.
- Power supply
- Two rack ears
Basic setup
Before setting up the system, we highly recommend that you download and read the manual.
Below is the basic flow for using this system
- Connect the included AC adapter to the transmitter and plug it into an outlet.
- Attach the included antenna to the transmitter's RF output jack.
- Connect a sound source such as a mixer output to the balanced input jack.
- Both L/R balanced input jacks can be used.
- For monaural sound sources, connect to the L/1 (Mono) balanced input jack.
- Press the power button to turn the transmitter on.
- The display lights and the main screen is displayed.
- Set the transmission frequency.
- The transmitter and receiver are set to the same frequency as the factory default.
- RF scan can be performed on the receiver and the results synchronized via IR SYNC to the transmitter (p. 31 of the manual).
- Turn the ON/OFF volume knob on the receiver to turn the power ON.
- The indicator lights and the display shows the main screen.
- Set the operating frequency.
- The transmitter and receiver are set to the same frequency as the factory default.
- RF scan can be performed on the receiver and the results synchronized via IR SYNC with the transmitter (p. 31 of the manual).
- Check the receiver's RF level indicator.
- If the RF level indicator is displayed, the signal is being received.
- Start playing.
- Check that the AF level indicators on the transmitter and receiver are moving.
- Connect the headphones to the receiver and slowly turn up the volume.
- Before connecting headphones, the volume on the receiver should be minimized.
There will be future Audio Solutions Questions of the Week containing additional and more advanced setup and use information. If you have further questions about this subject or any Audio-Technica product, please contact the Audio Solutions Department for additional assistance.