
Question: How do I set up my Audio-Technica USB microphone with my PC?
Answer: The setup of an Audio-Technica USB microphone may seem like a daunting task, but fear not! There are only a few settings you need to configure before you begin recording and podcasting. Please refer to the photos and follow the steps below to properly set up your USB microphone with your PC.
Configuring your PC:
1. Connect the microphone to your computer’s USB port using the provided USB cable. The microphone’s blue LED light will illuminate, indicating the mic is receiving power.
2. Locate the speaker icon in the task bar on your computer. It is often located at the bottom right of the screen.
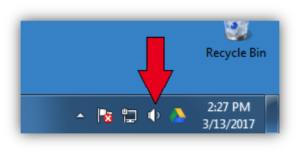
3. Right-click on the speaker icon and select “Sounds.”
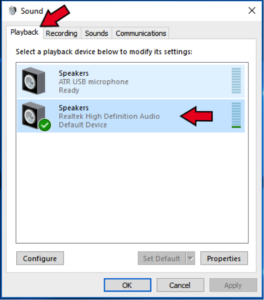
4. The Sound window will open up. Select the “Playback” tab at the top. Make certain the green check mark is next to your computer’s internal speakers, indicating they are set as the default playback device.
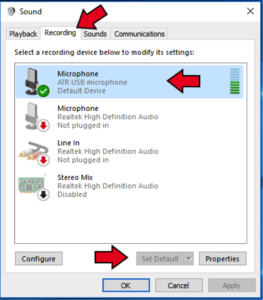
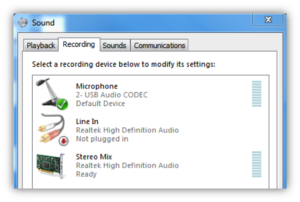
5. Select the Recording tab, and make sure the microphone is set as the default device with the green check mark. If it is not, simply click on the mic to select it, and then click “Set Default” at the bottom of the screen. Please note: If you are using an AT2020USB+ or AT2020USBi, the mic may be labeled as such.
6. Click on the microphone to highlight it. Then click the “Properties” button at the bottom right of the window. You may also right-click on the microphone and select “Properties.”
7. A new window will open. Select the levels tab to adjust the microphone’s audio level.
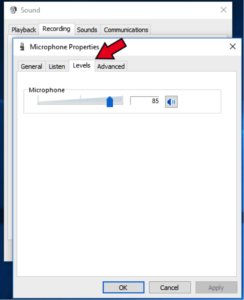
8. Click “Apply” and “OK” to close out of the Microphone Properties window. Then click “OK” to close out of the Sound window. You are now set to use your USB microphone with the recording software of your choice!
Please feel free to refer back to these instructions if you need to double-check settings or adjust the volume level of the mic. If you have any further questions about setting up your USB mic with your computer, please contact us here in the Audio Solutions Department.