
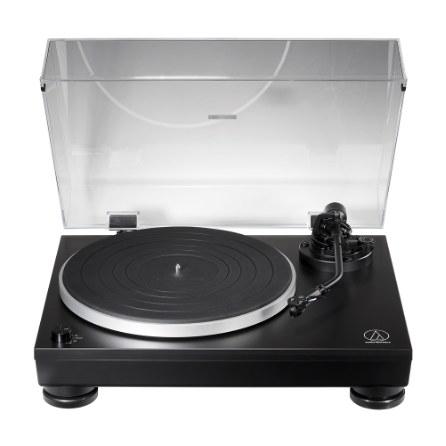
Question: How do I set up the AT-LP5X turntable?
Answer: The AT-LP5X features upgraded technology, including a direct drive, 3-speed (33-1/3/45/78 RPM) motor, MM/MC phono pre-amp and USB capability, all of which are housed in a mass-damped, high-density polymer cabinet. Setting up the AT-LP5X Direct-Drive Turntable properly will ensure that this high-performance machine works to its full potential. Improper setup may degrade the performance of the turntable and has the potential of causing premature wear to the stylus or to your records.
AT-LP5X Setup Instructions:
- Carefully remove the turntable from the packaging and verify that all of the parts and accessories are present. You should have:
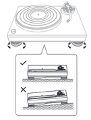
2. Position the turntable on a level surface. Place a level (not included) on the turntable from front to back and side to side to check that it is level. Turn the adjustable feet on the bottom of the turntable to make adjustments.
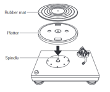
3. Place the platter on the turntable’s center spindle along with the rubber mat, making sure both are fully seated.
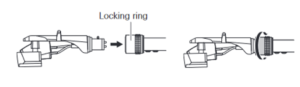
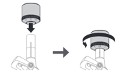
 4. With the tonearm locked into the resting position, remove the cable tie and attach the headshell into the socket at the end of the tonearm. Once in place, rotate the locking ring counterclockwise to lock the headshell into position.
 5. Install the counterweight on the rear of the tonearm, making certain the numbered stylus force gauge dial is facing the front of the turntable. As you rotate the counterweight clockwise (as seen from the rear of the turntable), the threads will engage and move forward onto the tonearm.
 6.Set the anti-skate adjustment knob (located at the base of the tonearm) to “0.” Then remove the stylus protective cover by sliding it straight forward, making certain to not dislodge the stylus from the cartridge. You may keep this protective cover for extra protection whenever you transport the turntable.
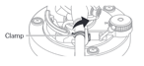
7. While gently holding the headshell to stabilize the tonearm, unlock the tonearm clamp. Be careful, as the tonearm is unbalanced at this point and may move up or down, potentially damaging the stylus tip if it drops onto or drags across the platter or other surface.
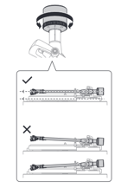
 8. While continuing to hold the headshell, slowly rotate the counterweight until the tonearm is horizontally balanced. If the cartridge end of the tonearm is lifting up into the air, the tonearm is too light, and you will need to turn the counterweight counterclockwise (as seen from the front of the turntable) to move the counterweight in towards the turntable. Likewise, if the cartridge end is going down towards the platter, the tonearm is too heavy, and you will need to turn the counterweight clockwise (as seen from the front of the turntable) to move the counterweight out away from the turntable. Once balanced, the tonearm will float above the platter as if in zero gravity.
 9. Without further adjusting the counterweight, lock the tonearm back into the resting position using the tonearm clamp.
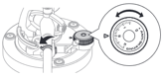
10. The numbered stylus force ring will turn independently of the counterweight. Turn just the numbered stylus force gauge so that the “0” lines up with the centerline on the top of the tonearm. Be careful not to move the counterweight while doing this step; just turn the numbered stylus force gauge.

11. Turn the entire counterweight (the numbered stylus force gauge will move along with it) to set the proper tracking force for the cartridge you are using.
- If using the included AT-VM95E cartridge, turn the entire counterweight counterclockwise so that the “2” lines up with the centerline on the tonearm. This indicates that the tracking force is now set to 2 grams of downward force for proper cartridge tracking.
- If using a different cartridge, make certain the proper tracking force is set according to the cartridge manufacturer’s specifications and that the cartridge is properly aligned.

12. Set the anti-skate adjustment. It is common practice to match the anti-skate value to the cartridge tracking force value. If using the included AT-VM95E cartridge, then set the anti-skate knob to “2,” which is the same value as the tracking force.
13. Install the clear plastic dust cover by placing the two hinges into the receptacles on the rear of the turntable. Then carefully guide the slots in the dust cover onto the hinges. Note that the cover only opens up to a 45 degree angle. You may remove the cover, if desired, instead of trying to force it open further, which may damage the product.
14. Connect the audio cables.
- If using the analog RCA output to a stereo or powered speakers, connect one end of the included RCA cable to the matching RCA colored-coded terminals on the rear of the turntable.
- If connecting to an external RIAA preamp that requires a separate ground terminal, connect the spade lug on the included RCA cable to the grounding post located next to the RCA terminals on the turntable.
- If using the digital USB connection to transfer your records to a Mac or PC, use the included USB cable to connect the USB output (Type B) on the rear of the turntable to the USB port (Type A) on the computer.
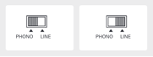
- Set the preamp switch on the rear of the turntable to correspond with the device you are connecting to.
- If connecting to a specified PHONO input on a stereo receiver, powered speakers or an external RIAA preamp, then move the switch on the rear of the turntable to the PHONO position, which disengages the turntable’s internal preamp.
- If connecting to a LINE level input on a stereo (i.e., CD, Tape, Aux, etc.), Aux input on powered speakers or using the USB digital output, then move the switch on the rear of the turntable to the LINE position, which engages the turntable’s internal RIAA preamp.
- If using the analog RCA output to a stereo or powered speakers, connect one end of the included RCA cable to the matching RCA colored-coded terminals on the rear of the turntable.
3. If using the supplied AT-VM95E cartridge or any other moving magnet cartridge set the MM/MC switch to MM. If using a moving coil cartridge, such as our AT33EV, set the switch to MC.
15. Connect the AC adapter’s cord to the power input jack of turntable and plug the AC adapter into an AC outlet.
16. The turntable is now set up and ready to play records.
17. For additional information about playing records, please refer to the user manual.
If you have further questions, feel free to contact the Audio Solutions Department for assistance.