
Question: How do I set up the AT2005USBPK Streaming/Podcasting Pack?
Answer: For a convenient direct digital connection to your computer, the AT2005USB microphone is a go-to choice for podcasters, streamers, and home recording enthusiasts. Audio-Technica has also created the AT2005USBPK streaming pack, consisting of the AT2005USB microphone, a boom microphone arm with integrated USB cable, and a pair of the ATH-M20x studio monitoring headphones. Additionally, an XLR cable is included if you want to connect your AT2005USB microphone to an analog microphone input instead of to a computer. Before using for the first time, you will want to ensure that you properly set up the microphone and cable, and configure the connections to your computer.
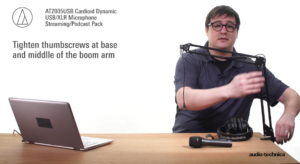
Set up the boom arm. You may attach the boom arm base clamp to a flat surface, such as a table or desk, that’s up to 2" thick. The clamp is padded to protect the surface you attach it to. The boom arm fits into the base clamp. Before mounting the microphone to the boom arm, tighten the screws at the base and middle of the boom arm. Use a 7 mm wrench to tighten and loosen the top nut on the boom arm. This will allow you to adjust the pivot point where the microphone mount attaches to the boom arm. Be certain not to tighten excessively.
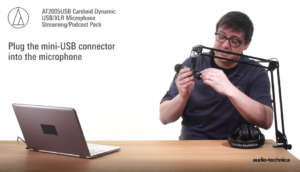
Attach the mount and microphone to the boom arm. Attach the stand clamp that comes with the microphone onto the boom arm. If not already in place, you will need to insert the included 5/8"-27 thread adapter into the stand clamp before connecting it to the boom arm. Next, insert the microphone into the clamp and make sure it is seated properly. Plug the cable’s Mini USB connector into the USB connection on the back of the microphone.
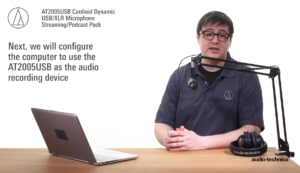
Configure computer settings. On a Windows OS computer, connect the other end of the USB cable to an open USB port on the computer. Right-click on the small speaker icon in the task bar and select Sound. Verify that the AT2005USB is selected as the input device by selecting it in the drop-down menu. By selecting the AT2005USB as your output device, the computer audio will be sent out to the headphone jack on the AT2005USB microphone. You may use the volume control dial on the back of the microphone to set the volume level of the headphones. You may adjust the input and output levels within the sound window by moving the appropriate volume sliders. Be certain not to set the levels too high or you may distort the signal from the microphone.
On a Mac OS computer, connect the other end of the USB cable to an open USB port on your computer. Open your “System Preferences” by clicking the gear icon in your dock or by searching through your Applications in Finder. Once in your System Preferences, double-click on the Sound icon to open the sound settings. Under the Input tab, verify that the AT2005USB is selected by clicking on it in the device list. Under the Output tab, select the AT2005USB to send the computer audio signal out to the headphone jack on the AT2005USB microphone. The volume control dial operates as described above. You may also set your input and output levels in the sound settings window by moving the appropriate input and output volume sliders. Be certain not to set the levels too high or you may distort the signal from the microphone.
To get the most out of your Audio-Technica Podcasting Pack, it is important to use the microphone properly. First and foremost, since the AT2005USB is a front-address microphone, you will want to speak into the front (or end) of the microphone. One way to tell if you are addressing the microphone correctly is to listen as you speak into different sides of it. The AT2005USB has a cardioid directional pickup, so the optimal pickup area will be directly in front of the microphone element. As you move away from this optimal spot and speak into the sides and back of the microphone pickup area, the sound will decrease in volume and quality. This may be used to your advantage to prevent unwanted sounds from being picked up by the microphone. If you are typing on a computer keyboard while speaking, for example, you may position the null pickup (or back of the microphone) towards the keyboard to minimize pickup of the keyboard sound. Additionally, you may speak off axis of the microphone element to reduce popping associated with plosives, such as P’s and B’s, which is caused by excessive breath directed onto the microphone. You may also use a windscreen or pop filter to reduce unwanted sound from plosives.
The AT2005USB microphone has a dynamic capsule and is designed to be used in closer proximity than condenser microphones, which are often more sensitive and allow you to speak from farther away. The dynamic capsule can be great if you are in a noisy environment since it will be less susceptible to picking up unwanted sounds. This design allows you to move the source (your mouth) closer to the microphone element and adjust your input level accordingly.
The video below shows you how to set up your AT2005USBPK Podcasting Pack. If you have further setup questions or need tips for using your podcasting pack, please contact the Audio Solutions Department for assistance.