

Question: What are the features of the AT2040USB and how do I set it up?
Answer: The AT2040USB microphone combines the broadcast-quality performance of the AT2040 dynamic microphone with plug-and-play USB functionality, making it easy for podcasters, streamers, and other content creators to achieve professional results.
In live streaming, good sound is just as important as interesting content and high-quality video. With its crystal-clear studio sound, the easy-to-use AT2040USB is the ideal microphone for YouTubers looking to increase their viewership and streamers wanting to gain a professional edge. This dynamic microphone features a highly directional, hypercardioid pickup pattern that isolates the user’s voice from surrounding noise, ensuring the focus remains on the spoken content.
AT2040USB Features
The AT2040USB has a robust metal body that ensures professional performance for years to come, and the microphone’s multistage foam mesh windscreen includes a nonwoven filter to allow close-up use with no annoying pops.
The AT2040USB has a high-resolution A/D converter that is capable of a 24-bit/96 kHz sampling rate. The USB port on the microphone is a USB-C type connection, and the mic comes with a USB-C to USB-A cable (plus a USB-A to USB-C adapter) to ensure broad compatibility with current and future devices.
The AT2040USB has a built-in headphone jack to enable zero-latency monitoring, as well as a headphone volume control and monitor mix control to allow the user to finely tune their recording experience. The microphone also includes a silent touch-sensitive mute button. This lets the user mute the microphone quickly and quietly so as not to disrupt a recording or streaming session. The LED indicator light on the AT2040USB will inform the user when the microphone is muted by switching from blue to red.
The AT2040USB also includes a low-cut filter, which eliminates low-frequency sound for additional reduction of vibration and surrounding environmental noise.
Basic Setup
Windows:
- Verify that you have all of the components.
- Connect the cable’s USB-C connector into the microphone.
- If your computer has a USB-A input, connect the other end of the cable directly into computer.
If your computer has a USB-C input, use the provided USB-A to USB-C adapter to connect the other end of the cable into computer.
Note that the blue light should illuminate on the microphone.
- Open the sound settings in your Control panel.
- Set the Output to “Headphones (AT2040USB)” and the Input to “Microphone (AT2040USB).”
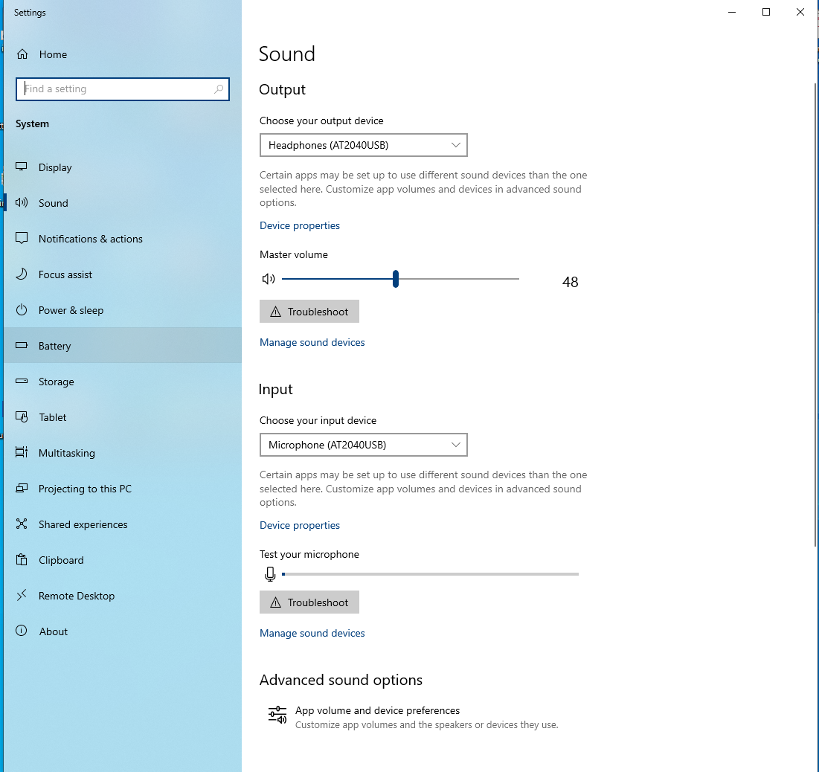
Please note that if are using the speakers on (or connected to) your computer, select that option in the Output pull-down menu.
Mac
- Verify that you have all of the components.
- Connect the cable’s USB-C connector into the microphone.
- If your computer has a USB-A input, connect the other end of the cable directly into computer.
If your computer has a USB-C input, use the provided USB-A to USB-C adapter to connect the other end of the cable into computer.
Note that the blue light should illuminate on the microphone.
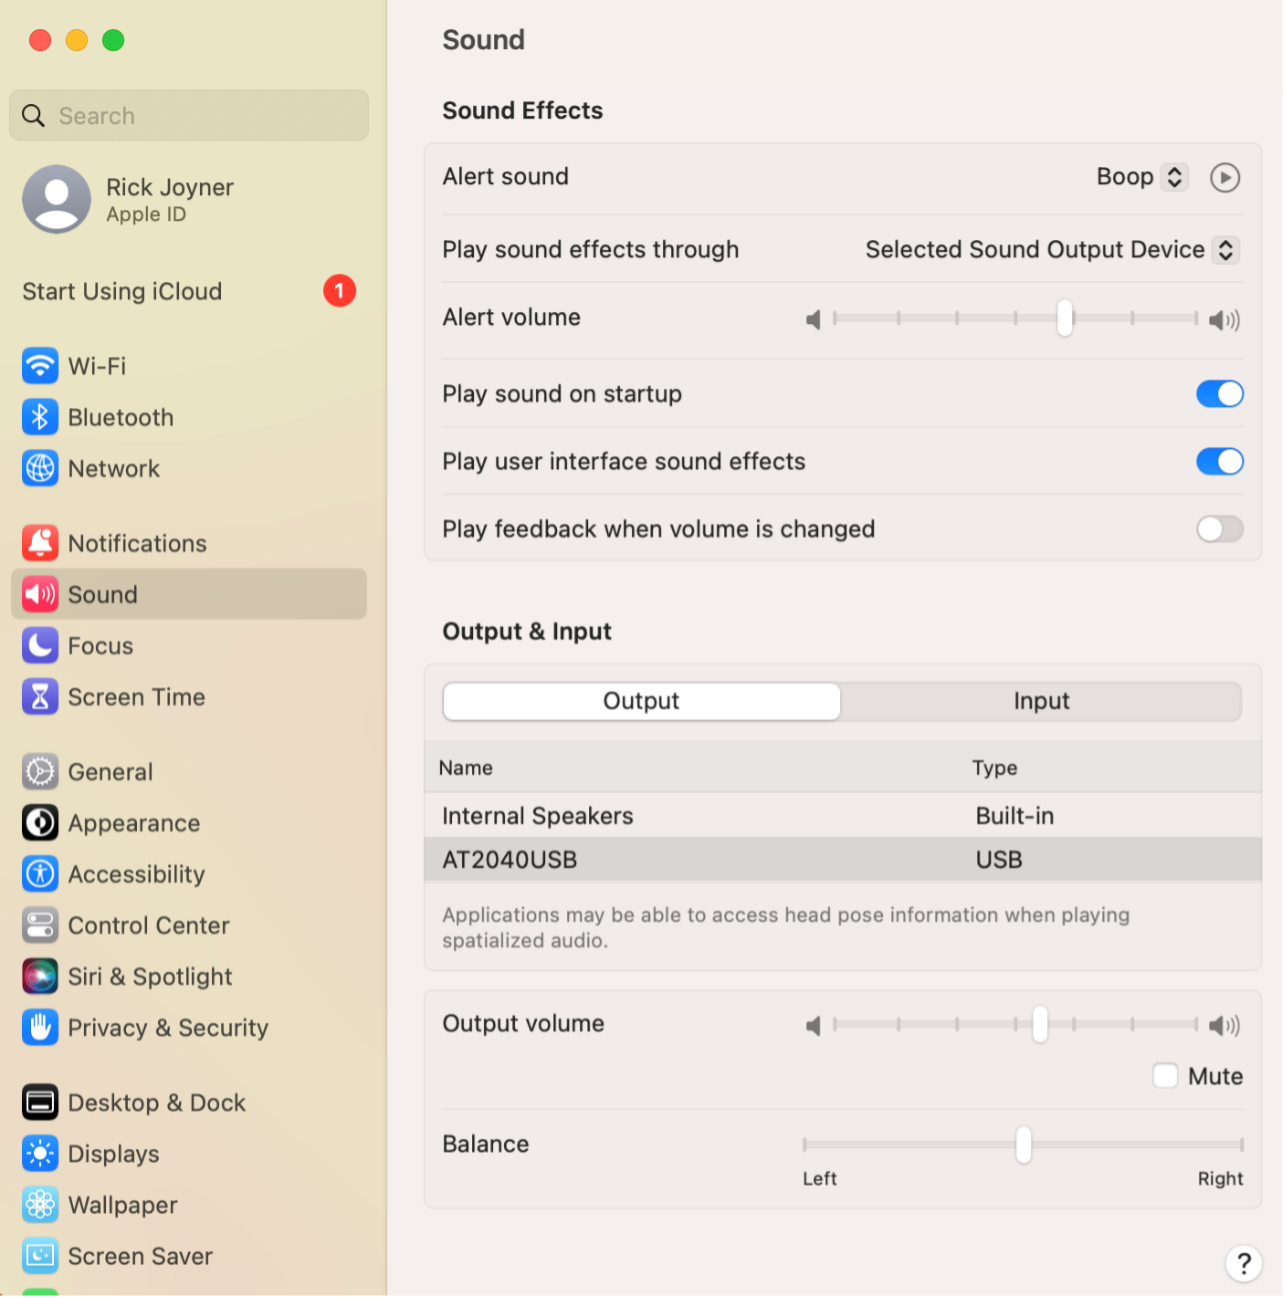
- Open the sound settings in System Preferences.
- Set the Output to “Headphones (AT2040USB)” and the Input to “Microphone (AT2040USB).”
Please note that if are using the speakers on (or connected to) your computer, select that option in the Output menu.
Microphone Controls
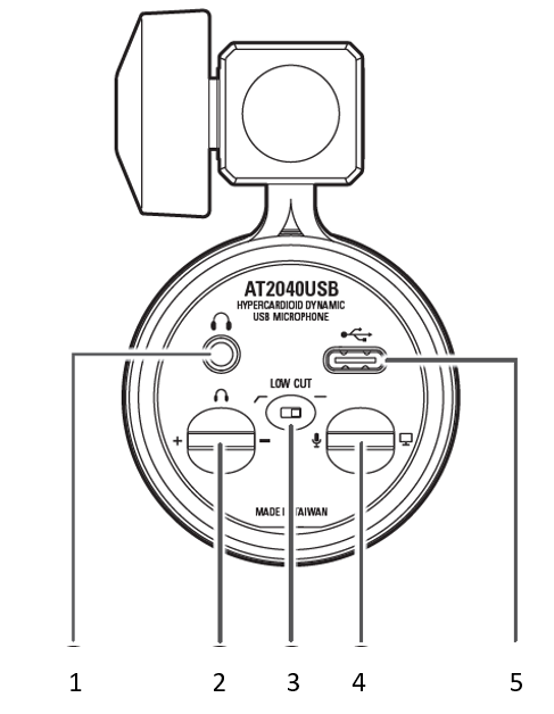
- Headphone jack (3.5 mm stereo mini-jack)
- Headphone level control dial
- Low-cut switch – the straight-line side is low-cut disabled; the bent-line side is enabled and cuts frequencies below 80 Hz
- Mix control dial – see the QOTW for "What is the Mix Control on my USB Microphone?"
- USB Type-C terminal
The indicator that illuminates blue when the mic is connected to your computer also indicates when the mic is muted. When blue, the microphone is not muted. Touch the sensor once and the indicator turns red, signaling that the microphone is muted. Touch it again and the indicator turns blue, signaling that the mic is on.
If you have any questions regarding the AT2040USB please contact the Audio Solutions Team for further information.