
Setting up the tonearm on a turntable
Watch our video on setting the tracking force
Apart from entry level turntables, like Audio Technica’s AT-LP60XUSB and AT-LP60XBT models that are set to fixed values, all turntables require the tone arm to be balanced and the anti-skate control set correctly to optimise their performance. It is important to know why these parameters are adjustable and how to get them set up perfectly.
Applying the proper tracking force for your cartridge is a very important step in maximising the performance of your turntable. Improper setup may cause distortion or sound from only one channel, among other non-desirable effects. The tone arm needs to be balanced and the tracking force set when initially setting up the turntable. It is also a good idea to check and adjust the balance and tracking force during routine maintenance, and whenever you replace the stylus and/or replace the entire cartridge. More seasoned vinyl enthusiasts may use a specialised gauge to set the tracking force, but the process outlined below works sufficiently for those new to the process.
The anti-skate feature applies a small outward force to the tonearm, counteracting the tendency of the arm to move inward (skate) toward the centre of the record, as the tonearm approaches the end of the record. Anti-skate is needed in order to maintain good channel balance (obtain equal volume from the left and right channels), minimise distortion, and to minimise stylus and record wear. These goals can be realised if the stylus (needle) tip can remain centred in the record groove as the tonearm travels across the record.
Balancing the tone arm
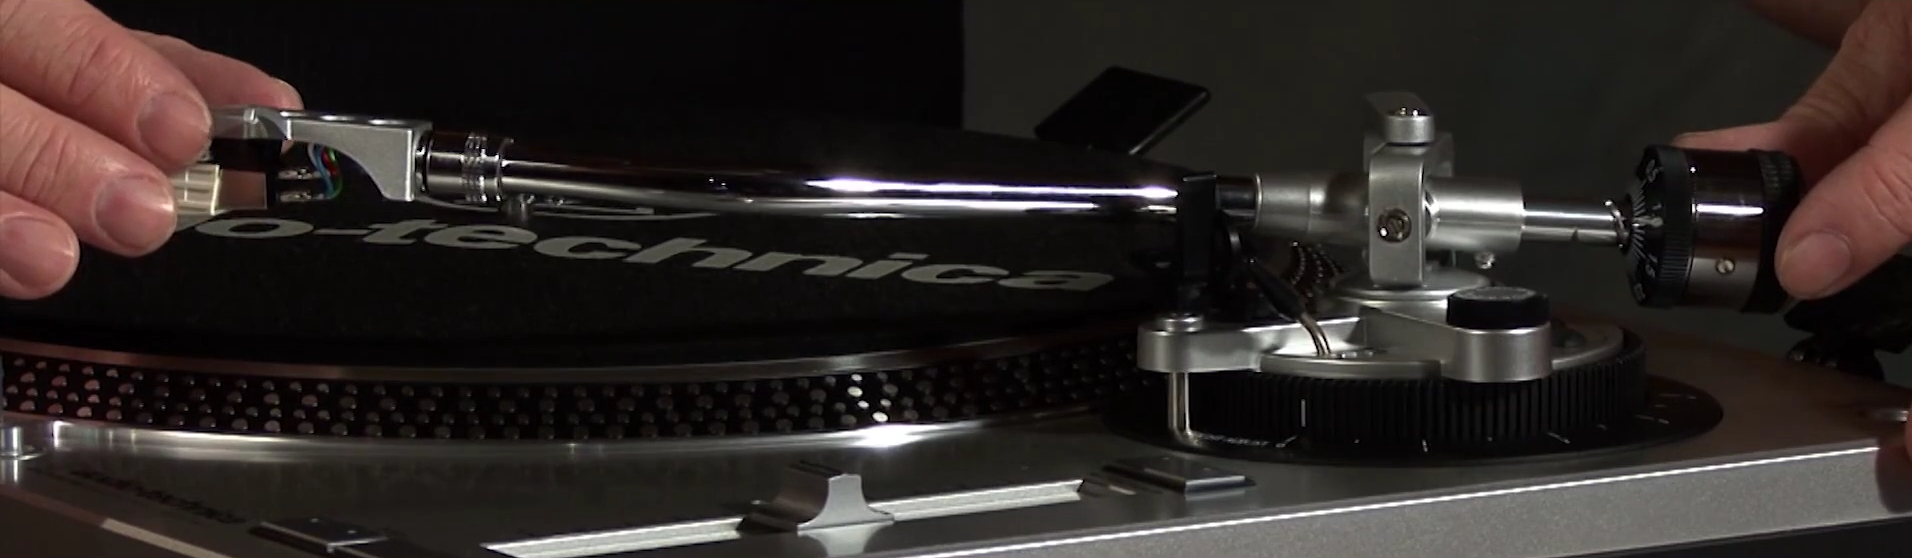
Start with the turntable powered off, and ensure the counterweight is installed correctly on the rear of the tone arm so that the numbers on the stylus force gauge ring face the front of the turntable.
-
With the tone arm locked in the rest position, carefully remove the protective cover from the stylus. The cover slides straight forward off the front of the cartridge. Be careful not to damage the exposed stylus.
-
Gently hold the headshell to stabilize the tone arm while releasing the tone arm locking clamp to stop the tone arm from swinging freely as it is unbalanced at this point.
-
With the cueing lever in the down position, continue to gently hold the headshell above the rest position.
-
Carefully rotate the counterweight on the rear of the tone arm until the tone arm is horizontally balanced, like a see-saw that has equal weights on both ends. When released, the headshell will neither move up away from the rest nor move down towards the rest, leaving it hovering freely above the rest position. It may take a few attempts to find the counterweight’s correct position.
-
Once the tone arm is properly balanced, lock it back into the rest. Be careful not to touch the counterweight as you do not want to lose your balance point.
Setting the tracking force
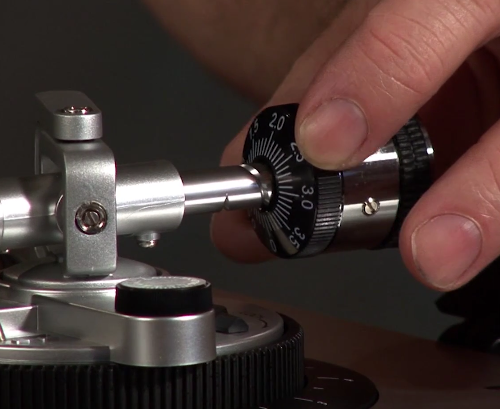
Every cartridge has its own recommended tracking force. This information should be included in the cartridge’s user manual, packaging, etc.
-
Locate the stylus force gauge ring on the front of the counterweight. This ring rotates independently from the counterweight. Once you have balanced the tone arm following the method above, rotate the force gauge ring (without moving the counterweight itself) until the number 0 lines up with the centreline on the top of the tone arm. This marks the current counterweight position as balanced or “zero gravity.”
-
Set the your stylus’ tracking force by rotating the entire counterweight assembly anticlockwise. The force gauge ring will move along with the counterweight, allowing you to set the counterweight for a specific tracking force. For example, the AT-VM95E cartridge requires a tracking force of 2.0 grams so the counterweight needs to be turned anticlockwise until the number 2 lines up with the centreline on the tone arm.
Always use the recommend tracking force for the specific cartridge you have chosen, and make certain your cartridge is properly aligned with the turntable’s tone arm.
Setting the anti-skate
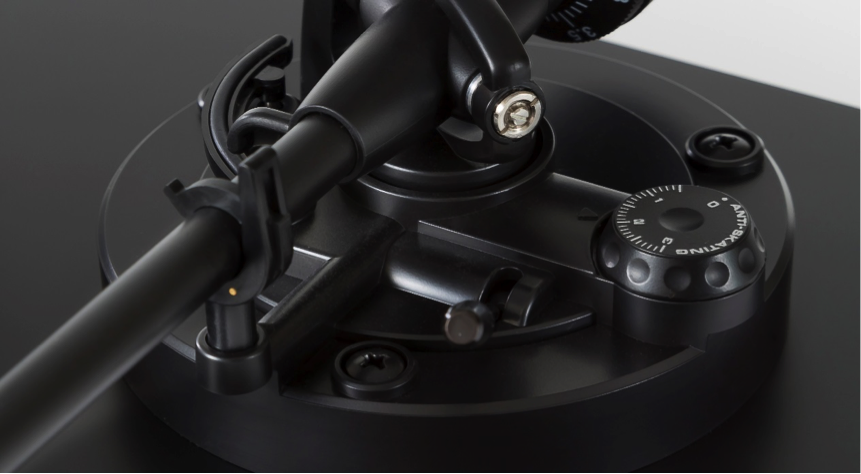
To set the anti-skate function on a turntable turn the pre-calibrated knob located to the right of the tone arm, to the same value as the vertical tracking force mentioned above. As a general rule this should give good channel balance, minimise distortion, and minimise stylus and record wear. If adjusting the anti-skate does not clear up a particular problem, there may be another reason for it.
If you have followed the above instructions and you’re still experiencing issues then contact us for further advice.