
How to set up an AT-LP120XUSB turntable
Watch our video on setting up the AT-LP120XUSB Turntable
Proper set up of the AT-LP120X turntable will ensure that it will perform to its full potential. Please follow the steps below. Do not install the dust cover or connect the AC power adaptor until assembly is complete.

Box Contents
Carefully remove the turntable from the package and verify that all the parts and accessories are present. You should have the following items:
- The turntable chassis
- Dust cover and dust cover hinges
- Aluminum record platter
- Felt record mat
- Headshell with preinstalled AT-VM95E cartridge
- Tonearm counterweight with integrated tracking force gauge ring
- Stylus target light
- 45 RPM record adapter
- Dual RCA audio cable with integrated ground wire
- USB cable
- AC power adapter
- Quick start guide
Setting up the Turntable
Position the turntable on a level surface. If the surface is not level, the turntable may be levelled by adjusting the feet on the turntable. The feet thread into the bottom of the turntable chassis and are screwed all the way in for shipping purposes. With the aid of a bubble level (sold separately) adjust the feet as needed to level the turntable. Raise the height of one or more corners by supporting the weight of that corner of the turntable with one hand while unscrewing the foot in a clockwise direction with the other hand.
Assemble the dust cover
Install the dust cover hinges into the slots on the dust cover, but do not install the dust cover onto the turntable at this time. Set this aside for later.
To avoid the effects of vibrations and acoustic sound pressure, do not position the turntable on top of or near any loudspeakers.
Install the platter
Carefully place the aluminium record platter on the turntable’s centre spindle, making sure it fully seats on the spindle. Place the felt record mat on the platter.
Setting up the tonearm assembly
Install the headshell/cartridge assembly.
Remove the twist tie and temporarily secure the tonearm to its rest with the locking clamp.
Attach the headshell with the pre-installed cartridge by inserting the headshell into the tonearm socket. While holding the headshell in position, rotate the headshell locking ring counterclockwise (to the left). As the ring rotates, it pulls the headshell into its seated position. Hand-tighten the ring until it is snug.
Install the counterweight
With the tracking force gauge ring end of the counterweight facing toward the front of the turntable, attach the counterweight to the back of the tonearm by rotating the weight in a counterclockwise (to the left) direction. As the weight rotates, it will thread onto the arm. Thread the weight onto the arm about halfway at this time; final adjustments will be made in the next step.
Balancing the tonearm
Caution: Do not drag the cartridge’s stylus across the platter or record mat while adjusting the tonearm’s balance or setting the tracking force. Doing so may damage the stylus assembly!
Remove the cartridge’s clear plastic stylus protector by pulling it straight off the front of the cartridge. Try not to pull down on the protector, doing so may dislodge the stylus assembly from the cartridge body.
Make certain that the anti-skate adjustment is set to “0” (no compensation) before proceeding.
While gently holding the sides of the headshell to stabilise the tonearm, release the tonearm locking clamp to allow the tonearm to swing freely. Continue to stabilise the tonearm while rotating the counterweight on the rear of the arm in the direction needed to balance the tonearm in the horizontal plane. Check for balance by temporarily releasing the headshell after each adjustment of the weight. Ultimately, the arm should float freely just above the tonearm rest, not touch the rest. In other words, a properly balanced tonearm will be parallel to the turntable chassis. Once the tonearm is balanced, place the tonearm into the tonearm rest and secure it using the locking clamp. Be careful not to rotate the counterweight while doing this.
Setting the tracking force
To set the proper stylus tracking force for the provided AT-VM95E cartridge, first locate the black tracking force gauge ring that is semi-attached to the front of the counterweight. Marked with numbers and lines indicating different tracking force values, the ring can be rotated independently of the weight. Without turning the counterweight itself, carefully rotate the ring only until the “0” on the ring lines up with the centre-line marked along the top of the tonearm.
Your tonearm is now properly balanced and calibrated so you can accurately set the tracking force for the stylus. The recommended tracking force for the provided AT-VM95E cartridge is 2.0 grams. To set the tracking force, rotate the counterweight, along with the ring, in the counterclockwise direction and stop when the “2” on the ring lines up with the centre-line on top of the arm. Note that the ring turns with the weight as you are rotating the weight. The numbers on the ring should be going up in value as you rotate the counterweight if you are turning the weight in the right direction.
Set the anti-skate adjustment
Set the anti-skate adjustment to the same value as the tracking force, 2.0.
Setting up audio and power connections
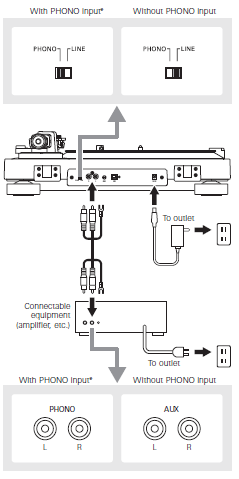
The AT-LP120XUSB turntable provides a traditional un-equalised PHONO level output as well as an optional RIAA equalised LINE level output thanks to a built-in switchable phono pre-amplifier. This makes it compatible with the traditional PHONO input jacks found on many stereo amplifiers and receivers, as well as the AUX or LINE level inputs on amplifiers or receivers, powered speakers and other audio devices. A 1.4 m (4.6′) dual RCA audio cable with an integrated ground wire is provided for making the connection. The RCA cable’s red plug is the right (R) channel, and the white plug is the left (L) channel.
Connecting to PHONO jacks
If your device has PHONO input jacks on it, this means it contains its own RIAA phono preamplifier inside. Since you cannot use TWO phono preamplifiers at the same time (which can result in extensive amounts of distortion), simply set the “PHONO-LINE” selector switch located on the rear of the turntable to “PHONO,” which bypasses the turntable’s internal preamplifier. If your device has a separate ground terminal, connect the RCA cable’s ground wire to it to help minimize any hum.
Connecting to AUX, AUDIO IN or other LINE level jacks
If your device does not have PHONO-type input jacks, the turntable may be connected to other types of inputs such as AUX, AUDIO IN, LINE, CD, etc. Set the “PHONO-LINE” selector switch located on the rear of the turntable to “LINE,” which turns on the turntable’s internal preamplifier. Note that if the switch is set to “PHONO,” you may have little to no sound at all. When the turntable is set to the LINE mode, the ground wire connection is not required.
Connect to computers
The turntable also provides a USB output, allowing it to connect digitally to Macs and PCs without the need for special drivers. Simply connect the provided 1.9 m (6.2′) USB cable to an open USB port on the computer. Compatibility with a wide range of third-party recording programs permits recording from the turntable to the computer. Make certain that the “PHONO-LINE” selector switch located on the rear of the turntable is set to “LINE” for USB use.
Connect to power and install the dust cover
After the audio connection is made, attach the included AC power cord to the AC power inlet on the rear of the turntable, then connect the opposite end of the cord to a convenient AC power outlet. Retrieve the dust cover and install on the hinges.
If you have any issues during the setup or have any follow-up questions, we invite you to contact us so that we can offer you further advice.