
Question: How do I set up, configure, and deploy the ES Wireless System in Wireless Manager?
Answer: The Audio-Technica Engineered Sound Wireless System is optimized for voice applications in meeting rooms, presentation halls, classrooms, and other installed audio conferencing environments. The system utilizes wireless DECT (Digital Enhanced Cordless Telecommunications) technology in the 1.9 GHz spectrum. This standard allows for higher channel counts by dividing the transmission spectrum into frequency and time divisions. There are five carrier frequencies and each frequency uploads (and downloads) data frames in 24 slots. For higher channel count needs, the HD (High Density) Mode expands the maximum channel count from 48 to 96 channels (in US and Canada).
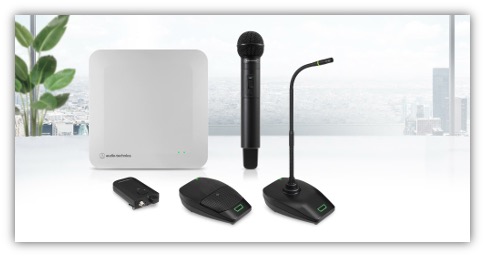
The ES Wireless system components are IP network-based for setup and deployment. The ESW-R4180DAN receiver is a low-profile receiver unit that easily mounts in the room using the included bracket. A single Cat 5e connection is all that is required to provide power via PoE, control the system via IP control, and carry eight channels of audio output via the Dante audio protocol. Up to eight transmitters can be linked to a single receiver, and a system can be designed with up to six receivers, to achieve 48 channels in SD (Standard Density) Mode, or up to 12 receivers for 96 channels in HD Mode.
There are four different transmitter models, which you can mix and match to create your system. The ESW-T4102 handheld transmitter (including the ATW-C510 capsule) has a 35-hour battery life and separate power and mute switches. The popular Audio-Technica interchangeable capsules can also be used with the handheld transmitter.
The ESW-T4101 body-pack transmitter works with cH-style lavalier or headworn microphones. For quick-deployment applications, the transmitter’s built-in omnidirectional microphone can be utilized by wearing the body-pack with the included neck strap, removing the need for a lav or headworn mic. The transmitter has a 25-hour battery life and is equipped with a push button to power on/off (long press) and mute/unmute (quick press).
The ESW-T4106 boundary microphone transmitter has a two-state RGB LED indicator with multiple selectable colors (seven colors and off) for visually identifying the mute status. The button on the front of the transmitter has three selectable mute operational modes, including toggle, touch-to-talk, and touch-to-mute. The pickup pattern is software-selectable to cardioid or omnidirectional to maximize the mic for different applications. The transmitter can operate for up to 22 hours on battery power or be powered via a standard USB-C charging cable.
The ESW-T4107 desk stand transmitter is used with the modular ES925 gooseneck microphones. There are six gooseneck lengths available, and three polar patterns to choose from: cardioid (120 degrees), hypercardioid (100 degrees), and MicroLine (90 degrees). Like the boundary transmitter, the desk stand transmitter offers the same two-state RGB LED indicator, three selectable mute modes, and USB-C charging if the 17-hour battery run time is exceeded.
There are two drop-in charging station options available for the ES Wireless system. The ESW-CHG4 is a two-bay charging station for the ESW-T4101 body-pack transmitters and the ESW-T4102 handheld transmitters. For the ESW-T4106 boundary transmitters and the ESW-T4107 desk stand transmitters, you will use the ESW-CHG5, which is a four-bay drop-in charging station. The charging stations may be linked together with a single network connection and AC power supply to charge up to eight transmitters (CHG4 x4 or CHG5 x2). Note: The charging stations are required for system configuration, deploying sync data from the receivers and software to the transmitters, and charging the transmitters’ internal lithium-ion batteries. Both chargers support rapid recharge, which is helpful, for instance, if a transmitter is mistakenly not docked to charge overnight. While docked, the charging status can be monitored via the software.
To set up and configure the system, the latest version of Wireless Manager software is required. When the system is launched and connected to a network, a computer running the software is required for deployment, but is not required for operating once completely set up. Wireless Manager does offer a monitor tab that allows an end user, site AV coordinator, or IT network staff to monitor the system performance and even pull the Syslog files to generate automated alerts for such instances as when a transmitter battery is low or when a transmitter is not docked in the charging station to recharge at the end of the day. These automated alerts help to ensure that the next user doesn’t encounter depleted batteries.
For designing and configuration purposes, make sure all the system receivers, charging stations with docked transmitters, and the computer running Wireless Manager are networked together. Drag and drop all the components of the system onto the Inventory tab in the software where you can manage all the individual pieces. Selecting the Device settings button for each component allows the integrator to make setting changes. For the receivers, you can set device and channel names, RF modes and power, network and Dante settings, and the 8-channel audio output settings. Transmitter settings include device names, level gains, mute mode, and LED color selection for the boundary and desk stand transmitters.
To create systems, navigate to the Link Configuration tab to import the components from the Device List or Unsynced Device button. Drag and drop the desired receiver into the Receiver column, up to eight desired transmitters into the Transmitter column, and chargers into the Charger column. Note: When adding the transmitters, the channel placement you drop them into will coincide with the Dante audio output channels. Setting the system to Roaming mode (in the receiver settings) allows transmitters to link with multiple receivers. In a multiroom, multireceiver setup, for example, the roaming feature lets you use the same transmitter as you move from room to room. Alternatively, a system can be designed with the roaming feature off, allowing multiple transmitters to link with a single receiver channel. For example, a single-room setup may require the use of eight handheld transmitters one day, and then four handheld transmitters and four boundary transmitters on another. The Link Configuration tab is the place to set up and configure all these different system designs.
The Monitor tab allows you to view real-time statistics of RF levels, AF levels, mute status, and battery levels of transmitters in use, as well as those docked in the charging stations. Creating groups and locations of devices in the software allows for customizable viewing of large systems with high channel counts and complete single- or multisite observations for AV and IT staff. Other software features include a Timed Walk Test and DECT RF Scan, which an integrator may use in presale site surveys, in determining max channel counts, and in testing receiver placement and coverage. User permissions and access passwords can also be set once integrators have commissioned the system, helping to eliminate erroneous system configuration changes.
If you have further questions on the ES Wireless Systems, you may contact our AE Team at AETeam@atus.com.